TunnelDeck Desktop Guide: Turn ssh -L into Saved Tunnels
Install TunnelDeck from source, create or import SSH local forwarding profiles, choose password or key authentication, verify host fingerprints, and safely open local web services.
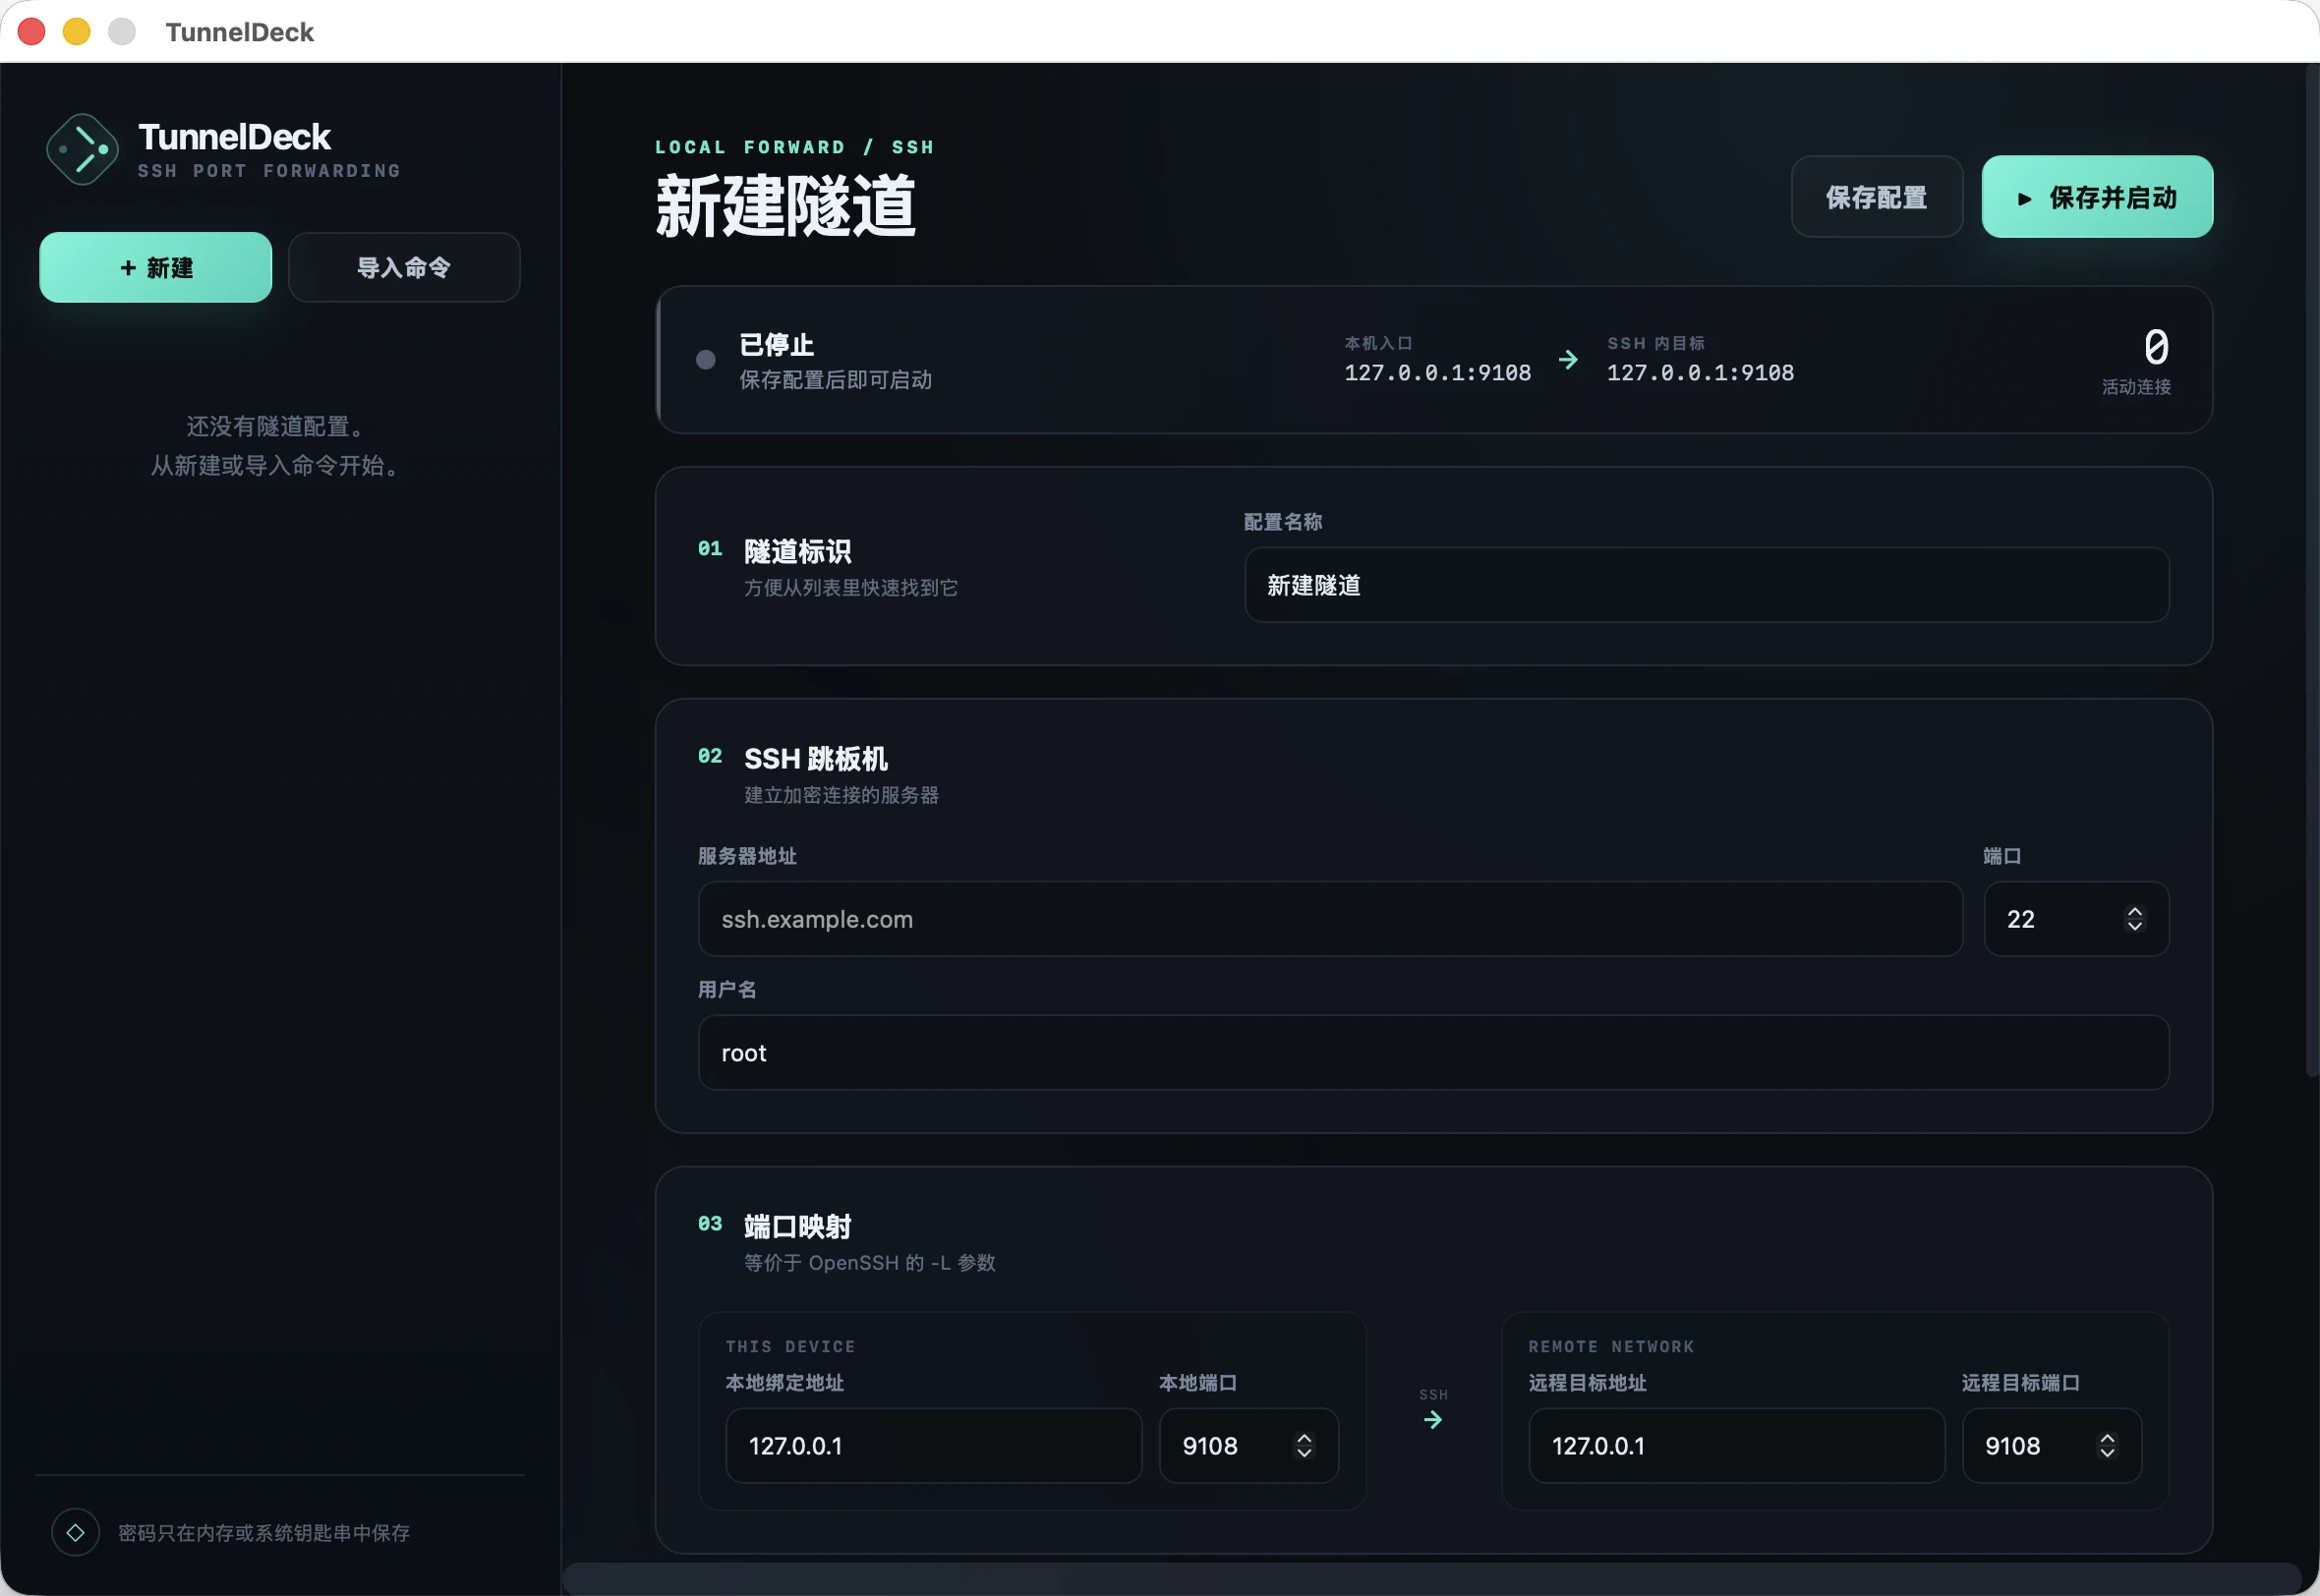
SSH local forwarding is useful, but a growing collection of commands makes ports, destinations, and key paths hard to manage. TunnelDeck is a lightweight, cross-platform desktop app that turns ssh -L into saved, editable tunnels with quick start and stop controls. It retains important safeguards such as host-fingerprint verification, operating-system credential storage, and local-only listening by default.
For example, TunnelDeck can import this command directly:
ssh -L 9108:127.0.0.1:9108 -p 33899 root@ssh.example.com
Once connected, a client on your computer opens 127.0.0.1:9108. Traffic travels through the SSH server to 127.0.0.1:9108 as seen from that server.
This guide focuses on desktop release v0.3.1: installation, importing and creating profiles, password and key authentication, first-use fingerprint checks, browser shortcuts, and practical troubleshooting.
Where TunnelDeck fits
TunnelDeck currently focuses on SSH local port forwarding (-L). It is useful when you want to:
- reach an administration page that only listens on a server's loopback interface;
- access a database, development service, or internal web app through a jump host;
- keep several frequently used tunnels and start only the ones you need;
- avoid reconstructing a long
ssh -Lcommand each time; - open a web tunnel in the default browser only after you explicitly request it.
It is not a VPN, and it does not implement remote forwarding (-R), SOCKS dynamic forwarding (-D), or a remote shell. The importer also rejects ProxyCommand and other options that could execute an external command.
Understand the four endpoints
The opening command maps to these fields:
| Field | Example | Meaning |
|---|---|---|
| SSH server | ssh.example.com:33899 | The SSH host and port TunnelDeck logs in to |
| SSH user | root | The SSH login account |
| Local endpoint | 127.0.0.1:9108 | The address applications use on your computer |
| Remote target | 127.0.0.1:9108 | The destination as seen by the SSH server |
The final field causes the most confusion. 127.0.0.1 in the remote target means the SSH server itself, not the computer running TunnelDeck. If the service runs on another private host reachable from the SSH server, enter that address instead, for example 10.0.0.20:8080.
Local application
  └─ 127.0.0.1:9108
       └─ encrypted SSH connection → ssh.example.com:33899
            └─ connection made by the SSH server → 127.0.0.1:9108
1. Install the desktop app
The project does not yet have Apple or Windows code-signing identities, so v0.3.1 does not distribute unsigned prebuilt desktop installers. The installation script checks the environment, downloads the source for a fixed release, and builds the app locally. This avoids asking users to bypass Gatekeeper or SmartScreen for an unsigned binary.
macOS and Linux
Run the dependency check first:
curl -fsSL https://raw.githubusercontent.com/Nciae-Zyh/TunnelDeck/v0.3.1/install.sh \
  | sh -s -- --check
Review the output, then install:
curl -fsSL https://raw.githubusercontent.com/Nciae-Zyh/TunnelDeck/v0.3.1/install.sh | sh
If curl is unavailable:
wget -qO- https://raw.githubusercontent.com/Nciae-Zyh/TunnelDeck/v0.3.1/install.sh | sh
Windows PowerShell
irm https://raw.githubusercontent.com/Nciae-Zyh/TunnelDeck/v0.3.1/install.ps1 | iex
The installer checks for Go 1.25+, Node.js 20+, and platform build dependencies. Missing Go or Node.js versions are placed in a private TunnelDeck user directory after their official SHA-256 hashes are verified; the global PATH is not changed.
- macOS also needs Xcode Command Line Tools and installs the app to
~/Applications/TunnelDeck.app; - Linux needs GTK3 and WebKitGTK 4.1 and installs the binary to
~/.local/bin/TunnelDeck; - Windows needs WebView2 and installs to
%LOCALAPPDATA%\Programs\TunnelDeck\, with a Start menu shortcut.
Before piping a remote script into a shell, read the v0.3.1 installer. The source installation guide contains the full dependency list and manual build steps.
2. Import an existing ssh -L command
If you already have a working command:
- Open TunnelDeck and choose Import command.
- Paste the complete
ssh -Lcommand. - Check the parsed SSH host, port, user, local endpoint, and remote target.
- Give the profile a recognizable name.
- Select an authentication method, save the profile, and start it.
TunnelDeck parses the arguments and establishes the connection directly through a Go SSH library. It does not concatenate the input into a shell command. To keep the import boundary auditable, it accepts one local forward and rejects remote commands, -R, -D, and ProxyCommand.
3. Create a tunnel manually
Select New, then enter:
- Name, such as “Development admin”.
- SSH server and port, such as
ssh.example.comand33899. - SSH username, using an account the server permits.
- Local listen address and port—normally keep
127.0.0.1and choose a free port. - Remote target address and port, reachable from the SSH server.
- Authentication, either password or SSH private key.
- Select Save and start.
The default 127.0.0.1 binding means only programs on your computer can use the tunnel. Do not switch to 0.0.0.0 or :: unless other LAN devices genuinely need access and the system firewall is configured. TunnelDeck displays an exposure warning for those bindings.
4. Choose password or key authentication
Password
Enter the SSH login password. Leave Remember credentials disabled by default. The password then stays in memory for the current run and is cleared from the tunnel object when the tunnel stops.
Private key
Select a private-key file. If the key is encrypted, enter its passphrase as well. Its public key must already be present in the server account's authorized_keys.
When you explicitly enable credential storage, TunnelDeck uses the operating system's secure store:
- macOS Keychain;
- Windows Credential Manager;
- Linux Secret Service.
The regular profiles.json file does not contain passwords, private-key contents, or key passphrases. Server-side least privilege, source restrictions, and key rotation still remain your responsibility.
5. Verify the host fingerprint on first connection
On the first connection to an SSH server, TunnelDeck displays its SHA-256 host fingerprint. Do not approve it merely because a dialog appeared. Compare it with the server console, an operations record, or another trusted channel before choosing Trust and connect.
The confirmed key is written to TunnelDeck's own known_hosts. If the server key changes later, TunnelDeck blocks the connection instead of silently accepting it. A legitimate server rebuild can cause such a change, but verify the cause before replacing the trusted key: it can also indicate a wrong hostname or interception.
6. Use the service after connecting
Once the tunnel is shown as running, point the client at its local endpoint:
- for a web app, open
http://127.0.0.1:9108; - for a database, connect the database client to
127.0.0.1and the selected local port; - for another TCP protocol, use the same local endpoint in that protocol's client.
For HTTP or HTTPS targets, enable This is a web service in the profile and choose the protocol. A running tunnel then shows an Open webpage button that launches the system default browser only when selected.
TunnelDeck does not open a page when the app launches, a tunnel starts, or an automatic reconnect succeeds. Many forwarded ports are not HTTP services, so keeping connection and browser navigation separate avoids invalid URLs and repeated browser windows.
7. Daily management and reconnects
The profile list shows status and active connection counts. You can start, stop, edit, or delete a profile. When changing a running tunnel, stop the old connection before applying the new values so an old listener is not mistaken for the edited configuration.
TunnelDeck sends SSH keepalives and retries temporary failures with exponential backoff from 2 to 30 seconds. A reconnect restores the tunnel only; it does not open a browser.
Troubleshooting
The local port cannot be opened
Another process probably owns the port. Choose another local port or identify the listener:
lsof -nP -iTCP:9108 -sTCP:LISTEN
The SSH server is unreachable
Check the hostname, SSH port, username, firewall, and whether the current network permits the connection. A terminal connection using the same non-secret parameters can help isolate the problem, but never place a password in the command or a screenshot.
The tunnel runs, but the target does not respond
Evaluate the target from the SSH server's perspective. When it is 127.0.0.1, the service must be running on the SSH server itself. Confirm that the target actually listens on the configured port and accepts connections originating from the SSH host.
A private key fails
Make sure you selected the private key rather than its .pub file, the key format is supported, and the encrypted key's passphrase is correct. The private key should be readable only by your operating-system account.
TunnelDeck reports a changed host key
Stop and determine whether the server was rebuilt or the hostname now resolves elsewhere. Replace the trusted key only after verifying the new fingerprint through a trusted path. Do not disable verification just to make the warning disappear.
Why the desktop app is lightweight
TunnelDeck is built with Go, Wails, and Vue 3. It uses the operating system WebView instead of bundling an entire Chromium runtime, and golang.org/x/crypto/ssh establishes the tunnel directly. The current macOS ARM64 application bundle is about 8.7 MB.
The project is MIT-licensed. Source, installers, and release history are available in the TunnelDeck GitHub repository, and the current stable source release is v0.3.1.
The Chrome Web Store version is now available
TunnelDeck's Chrome side-panel extension v0.3.1 is now publicly available from the Chrome Web Store. Source code, desktop installation scripts, and issue tracking remain available in the TunnelDeck GitHub repository.
Use this installation order:
- Install the TunnelDeck desktop app using section 1 of this guide or the GitHub README.
- Install the extension from the Chrome Web Store.
- Start the desktop app and confirm the official extension ID
jnfkjehpbkmfnidfcilehhkpbjjinmodunder Chrome browser integration. - If the native service is not registered, select Register Chrome service, then reload the extension.
- Select the TunnelDeck toolbar icon to manage profiles from Chrome's side panel.
The extension uses Native Messaging to control TunnelDeck on the same computer. It can create, edit, import, start, and stop profiles, and it opens a marked web service only after the user selects the action. It does not establish SSH inside the browser process: the store extension provides convenient controls, while the desktop app remains the SSH tunnel runtime.
Comments
Sign in to join the discussion
Your email remains private; only your display name appears.